Friday, February 24, 2017

Simple Yet Dramatic Shawl Scarf Is Easy to Make


Are you like me and just love the shawls worn in the front as a scarf? They are actually really easy to make and are suitable for a beginner. They are worked flat and only require knowing how to knit, purl, and make an increase.

Once you get your feet wet making a simple yet dramatic shawl you will be ready to face a more complicated pattern but for now, this is a great project to start.


This shawl is made with a lightweight yarn and over-sized needles (15). It's just a basic stockinette with a garter stitch border. Because of the large knitting needles it works up fairly quickly. I added the fringe and it was so light that it floated in every direction so I added a large seed bead at the end of every section of fringe to weight it down.


It's a simple pattern. Cast on 3 stitches and make an increase at both ends of every other row. For this one I did a yarn over after garter edge was established. First work in garter until you have the number of stitches necessary for garter border. So, if you want 5 stitches on each side, cast on 3 stitches, KFB (knit front and back of same stitch), K1, KFB, knit a row, Continue until you have 11 stitches then K5, YO, K1, YO, K5, turn knit 5, purl 3, knit 5, Turn. K5, YO, K3, YO, K5, turn. K5, P5, K5. turn K5, YO, K5, YO, K5 turn K5, P7, K5. It's just a matter of knitting the 5 st border, doing a YO, knitting the stitches up to the 5 st border on other end, doing a YO, knitting the 5 st border, turning, knitting the 5 stitch border, purling the stitches between borders, and knitting the 5 st border at the end of the row. Continue until it's the desired length.

I used almost 1 1/2 skeins of a lightweight alpaca blend for this shawl scarf. It's very warm and looks amazing.

I used Berroco Andean Mist. There's 164 yds (150m) in each skein. I expected to fully use both skeins but stopped a bit early so that I'd have enough for fringe. Next time I would cut off the strands I needed for fringe ahead of time and use up the second skein in the making of the shawl.

I should call this Angel Shawl or Cloud Shawl because the fringe floated everywhere before I added the beads. Winters get so dry. But I think the shawl scarf is even more a fall or spring accessory. Oh, I use them in the winter also, but they are just right to take the edge off on a brisk spring morning or crisp fall evening. And then they're visible instead of tucked inside a warm winter coat.

Wednesday, February 15, 2017

Classic Knit Cardigan From Purl Soho

Purl SoHo's Knit Classic Cardigan with Slight Revision


I made this classic cardigan, getting the pattern from Purl SoHo. First I made it with Wool Ease Moonlight. Because it was knit in stockinette it curled, even with the iCord edging. No picture here. Then I made it with this gorgeous purple Cozy Wool called Velvet. Both are my favorite yarns for the aesthetic, delightful colors. To attempt to avoid the stockinette curl I did a 7-stitch moss stitch edging while working the cardigan. It turned out great except that it needs buttons or snaps or something to keep the cardigan in place. It wants to slide down my shoulders. It worked up well though, taking a lot less time than I expected. It took 6 skeins of yarn with each color choice. The body took almost 4 complete skeins and the sleeves each took a skein of yarn.


Overall, very happy with this classic cardigan. It knit up so easily and quickly with the chunky yarn. I did not do the sleeves on the Moonlight version so I've been wearing it as a vest and it's very comfortable and lovely even as a vest. As you can see here, the Velvet version stays closed on the mannequin. It's not pinned or anything. I think it's the weight of the sleeves pulling it down when I wear it. A sew on snap or a shawl pin would be enough to control the creeping though.


I have six skeins of mustard yellow Wool Ease waiting for the next one. I will do a moss stitch or garter stitch edge again but not so wide. Maybe 3 or 4 stitches instead of 7 stitches.

Monday, February 13, 2017

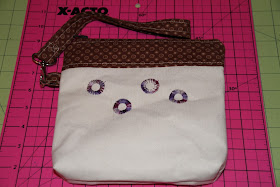
Zippered Bag Made Using Flower Foot for Sewing Machine


When I bought the special edition Singer Sewing Machine it came with a flower foot. Also known as circle foot. It is simple to install, just remove shank and screw it into place, the same method as for attaching a darning foot, quilting foot.

It's fun to play around with different stitch styles to get different styles of circles. There are ways to tweak the foot's action to get circles that look even more specifically like flowers but using a variegated thread works well also.


It's just fun. The key is to use interfacing behind the fabric and then use a fun thread to make a pop of color. I made this bag just because I wanted to use the flower foot but it's perfect for carrying my circular knitting needles to Knitting Night at the local yarn shop. I use a tote, which is open at the top, so it feels more secure to have loose items safely contained within bags.


This bag would work well for a night out, just large enough for phone, card, and a few essentials. I have gotten into the habit of adding a tab with a D ring or O ring on every simple lined bag I make so that I can add a strap down the road if needed.


These bags are so handy. I use them to organize everything. Quite often the experiments I do find their way into use as cord holders, travel bags for jewelry, coin bags for foreign currency, to hold my camera filters, and on and on the list goes.

Thursday, February 9, 2017

Almost Leather Display Head Form


A few months ago I was looking for a head form for displaying hats for photos and possibly for blocking. I have the standard white foam head display but though it does the deed, it's rather boring and if I use flash it reflects too much. I was really thinking a wood form would be nice but that was a bit beyond my skill level.

When I was in seventh grade I tried to carve a boxer dog head out of wood and that was a total disaster. The only help the shop teacher gave me was telling me to glue three pieces of wood together to form a giant block. Beyond that my dad helped with the band saw to cut out the general shape, ears, muzzle. No one told me what to do beyond that so for years I had a block of wood that was distinguishable as a dog's head from the side but nothing recognizable from the front or back. I digress. But that is why I fear carving wood or heaven forbid, turning wood on a lathe.

So, after many fruitless hours online, getting distracted with youtube videos that had nothing to do with head forms, I took to the sewing machine with some cheap, crappy fabric that I did not mind wasting with experimentation. First I went with the doll's head idea. Nope. That was not it. Tried a few other shapes and decided that a simple shape would do. That worked but the first one was too small, the second one was so big that no hat would fit over it so I had to adjust the size until it was just right. Had a pink head working model and a pattern was born.


Now here we are a few months later and I decided I better get back to the head form. I had some faux leather vinyl laying about and decided that would work to make one and see how it turned out. It turned out great! I am so happy with how it turned out and it looks like a luxurious leather. Very happy with it. So I made another, just a wider seam and trimmed off half an inch on the strip running down the middle. If I make another I would trim off an inch from the center strip and leave the seam allowance the same. I think. Well, I like both versions for different reasons.

The strip is long enough that after sewing the sides to the strip there is about a 2" flap, which makes attaching the foam core board base much easier. I also stuffed a baggy of rice in the form before closing it up to give it some weight. That worked really well.


Expect to see a lot of these head form displays as they will be my new hat displays going forward. If I end up doing more I might consider some bbs for the weight instead of rice. The rice works well but if they get wet, not good. So, for blocking, probably a wool or a canvas would work. Have to investigate a few options first, since I don't want to make anything that will hold onto the moisture until it mildews. Very happy with my faux leather head forms though. They give me the happy feels.