During these crazy times of COVID-19 and the social distancing, isolation, and mask wearing, I have been in the crowd of making lots and lots of masks for friends, family, and medical personnel. The most popular style is the deacon mask because even a novice sewer can do those. But the Olson mask is also easy to sew and preferred by many medical personnel.
I started with the Olson mask from here: Olson mask pattern A
From Instructable Crafts
Then I made some changes as a result of watching a video of a hospital who was requesting masks and specifically Olson mask style. I eliminated an extra step and as a quilter used the chain stitching method to speed things up.
Keep in mind that this is all new. Most of us had never sewn a clothe face mask before two or three weeks ago. There is a learning curve and as people learn best methods things change.
This is my method. I can actually sew them up faster than the deacon style (pleated rectangles) but cutting is a bit slower though not bad.
Steps:
First, print 3 copies of Pattern A.
Cut out patterns pieces.

1st piece will be used as is. This will be the outer face of the face mask.
With 2nd piece, cut vertically 4 1/2" from right side edge. This will be the side pieces of lining.
With 3rd piece, cut vertically 2" from right side edge. This will be the pocket piece of lining.

You can clip points of side lining pattern to eliminate the little dog ears.

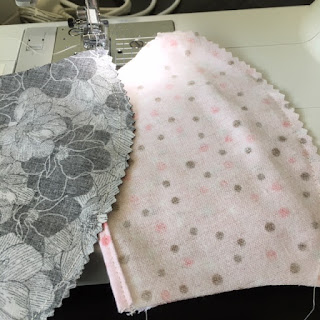
Cut 2 pieces of quilting cotton or other cotton fabric that will hold up to washing for the outer face.
Cut 2 pieces of flannel or cotton fabric for side pieces.
Cut 2 pieces of flannel or cotton fabric for pocket piece.
Clip or mark tops of mask pieces if necessary. I recommend this for the first few for sure. The top has a sharper rise and point. It matters most when placing outer piece to lining pocket piece. If tops don't match it won't work. If top of side lining pieces don't match it will still sort of work but the overlap will shrink.
The edges where we cut the pattern piece need to be finished as they will be left exposed. To finish the edge I fold under about 1/8" and fold over again so that edge is completely encased when I sew the seam along the edge of the fold but you can fold over 1/4" and either zig zag or use pinking shears to keep the edge from fraying.
I do the chaining method of sewing whenever possible. It saves time and thread. If you want to do the chain sewing this is the order I sew each mask so that I don't have to raise the needle for the whole mask.
Sew the curved seam of the lining pocket.

Sew the inner edge of a side piece.

Sew the edge of the lining pocket piece.

Sew the inner edge of a side piece.

Sew the second edge of the lining pocket piece.
Sew the curved seam of the two front facing pieces.

That was all done without having to raise the needle.
I trim both curved pieces with pinking shears. You can clip if you don't have pinking shears.
Now place right sides together of front facing and lining pocket, matching seams. I stick a pin here to hold it in place.

Now position a side lining piece with its matching front facing position.
You can pin all the pieces in place if you want but I don't. The flannel clings to the outer piece quite nicely and stays put but some people like to pin, especially when starting.

The side lining piece and pocket lining piece overlap.

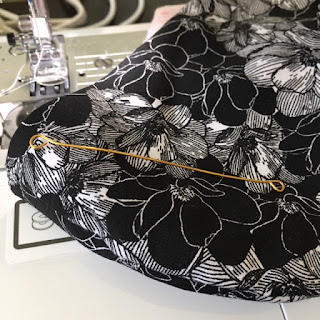
Sew around perimeter of mask. Back tack a few stitches (2-3) whenever you reach a finished seam edge to help strengthen the spots where there will be a lot of pressure if people need to insert/remove some filter. When you reach seams, to avoid bulk, make seams face in opposite directions. Continue just past seam then lining up second side lining piece in its proper position and continue sewing.

Clip tops of curved seams, being careful not to cut through stitching. 4 places to clip.


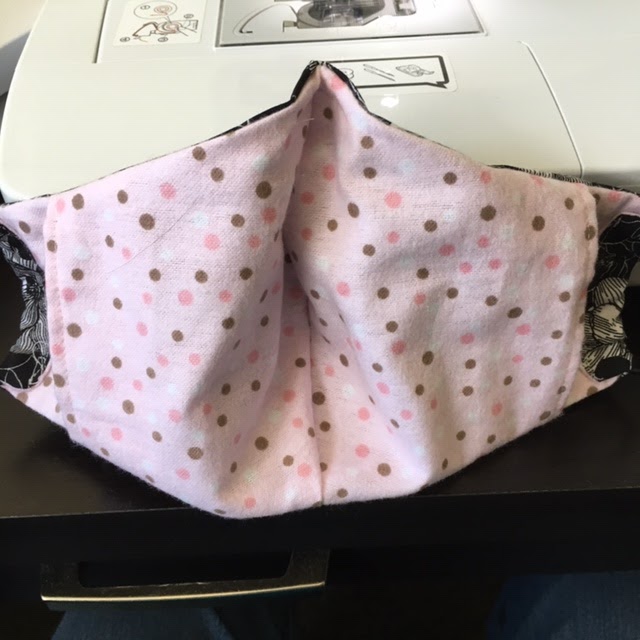
Turn right side out through pocket.
To make casing for nose wire, start sewing about 1" before seam and stop about 1" after seam, 1/4"-5/8" from edge, being sure to back tack at start and end. I cut the wire about 4" and curve the ends. After inserting wire into casing through pocket, I bend wire ends down. This helps keep it positioned in the casing.

 If the wire resists going through casing try going through on other side.
To attach pony tail holders, bias tape, or elastic...
I use pony tail holders. The most stretchy I can find, which so far has been Scrunchi.
If you have elastic, cut about 7-8" and overlap ends about 1/2" and sew shut, forming a loop.
If you are using bias tape, you will need two strips of 40", one for each side.
Insert ends of mask through elastic loop, fold over, and sew along edge. I try to keep casing to 1/4" or as close as possible. Be sure to back tack at start and end as there will be a lot of pressure on the casing ends.

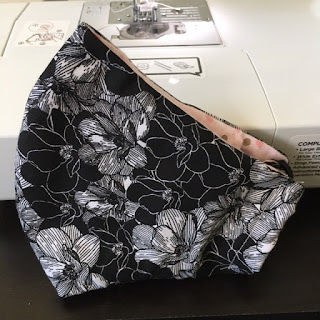
There is a lovely finished Olson style mask with nose wire.


I hope you find this helpful. Remember, we are all new at this and as we learn we tweak and improve the best we can.
I have made over 100 masks so far (and still going), some deacon and some Olson style. I actually prefer the Olson style, both to wear and making it. It's maybe a personal choice and I'm not sure why I like the look so much better. I think it's because the deacon style looks like a medical mask whereas the Olson style looks like a post-apocalyptic fashion statement. :)
What I do know is that a lot of people have dusted off their sewing machines, cracked open bins of fabric stashes, and burnt the midnight oil making all sorts of masks for family, friends, and medical personnel. For our community.
I hope you find this a faster, stream lined version and if I helped anyone at all with this, then it was worth the time to map out the steps.

I started with the Olson mask from here: Olson mask pattern A
From Instructable Crafts
Then I made some changes as a result of watching a video of a hospital who was requesting masks and specifically Olson mask style. I eliminated an extra step and as a quilter used the chain stitching method to speed things up.
Keep in mind that this is all new. Most of us had never sewn a clothe face mask before two or three weeks ago. There is a learning curve and as people learn best methods things change.
This is my method. I can actually sew them up faster than the deacon style (pleated rectangles) but cutting is a bit slower though not bad.
Steps:
First, print 3 copies of Pattern A.
Cut out patterns pieces.

1st piece will be used as is. This will be the outer face of the face mask.
With 2nd piece, cut vertically 4 1/2" from right side edge. This will be the side pieces of lining.
With 3rd piece, cut vertically 2" from right side edge. This will be the pocket piece of lining.

You can clip points of side lining pattern to eliminate the little dog ears.

Cut 2 pieces of quilting cotton or other cotton fabric that will hold up to washing for the outer face.
Cut 2 pieces of flannel or cotton fabric for side pieces.
Cut 2 pieces of flannel or cotton fabric for pocket piece.
Clip or mark tops of mask pieces if necessary. I recommend this for the first few for sure. The top has a sharper rise and point. It matters most when placing outer piece to lining pocket piece. If tops don't match it won't work. If top of side lining pieces don't match it will still sort of work but the overlap will shrink.
The edges where we cut the pattern piece need to be finished as they will be left exposed. To finish the edge I fold under about 1/8" and fold over again so that edge is completely encased when I sew the seam along the edge of the fold but you can fold over 1/4" and either zig zag or use pinking shears to keep the edge from fraying.
I do the chaining method of sewing whenever possible. It saves time and thread. If you want to do the chain sewing this is the order I sew each mask so that I don't have to raise the needle for the whole mask.
Sew the curved seam of the lining pocket.

Sew the inner edge of a side piece.

Sew the edge of the lining pocket piece.

Sew the inner edge of a side piece.

Sew the second edge of the lining pocket piece.
Sew the curved seam of the two front facing pieces.

That was all done without having to raise the needle.
I trim both curved pieces with pinking shears. You can clip if you don't have pinking shears.

Now place right sides together of front facing and lining pocket, matching seams. I stick a pin here to hold it in place.

Now position a side lining piece with its matching front facing position.
You can pin all the pieces in place if you want but I don't. The flannel clings to the outer piece quite nicely and stays put but some people like to pin, especially when starting.

The side lining piece and pocket lining piece overlap.

Sew around perimeter of mask. Back tack a few stitches (2-3) whenever you reach a finished seam edge to help strengthen the spots where there will be a lot of pressure if people need to insert/remove some filter. When you reach seams, to avoid bulk, make seams face in opposite directions. Continue just past seam then lining up second side lining piece in its proper position and continue sewing.

Clip tops of curved seams, being careful not to cut through stitching. 4 places to clip.


Turn right side out through pocket.
To make casing for nose wire, start sewing about 1" before seam and stop about 1" after seam, 1/4"-5/8" from edge, being sure to back tack at start and end. I cut the wire about 4" and curve the ends. After inserting wire into casing through pocket, I bend wire ends down. This helps keep it positioned in the casing.


To attach pony tail holders, bias tape, or elastic...
I use pony tail holders. The most stretchy I can find, which so far has been Scrunchi.
If you have elastic, cut about 7-8" and overlap ends about 1/2" and sew shut, forming a loop.
If you are using bias tape, you will need two strips of 40", one for each side.
Insert ends of mask through elastic loop, fold over, and sew along edge. I try to keep casing to 1/4" or as close as possible. Be sure to back tack at start and end as there will be a lot of pressure on the casing ends.

There is a lovely finished Olson style mask with nose wire.

I have made over 100 masks so far (and still going), some deacon and some Olson style. I actually prefer the Olson style, both to wear and making it. It's maybe a personal choice and I'm not sure why I like the look so much better. I think it's because the deacon style looks like a medical mask whereas the Olson style looks like a post-apocalyptic fashion statement. :)
What I do know is that a lot of people have dusted off their sewing machines, cracked open bins of fabric stashes, and burnt the midnight oil making all sorts of masks for family, friends, and medical personnel. For our community.
I hope you find this a faster, stream lined version and if I helped anyone at all with this, then it was worth the time to map out the steps.