Bowl Cozy Tips and Suggestions

I decided to make some bowl cozies a few months ago. Where have they been all my life, right? I mean, who hasn't resorted to wrapping a kitchen towel around a hot or cold bowl while heading for the couch to watch a favorite show on tv?


Ice cream is the worse. I don't know about you but I don't always think about grabbing a towel or crocheted trivet when filling a bowl of ice cream for a treat while watching a show and that bowl gets really cold.
So I made some lovely bowl cozies. LOVE them! There are a lot of videos out there on how to make a bowl cozy. This is more of little hints and suggestions for things I encountered while making them that were not really addressed in the videos that I watched prior to taking on this project.
First, there were videos that showed to use 9" squares of fabric or 10" squares of fabric. I went with the 10" squares. It's a nice size for most bowls. I do have a few tall bowls that the 9" would give a more snug fit but 9" would not work for the Pyrex bowls that I put leftovers in for warm up.
If you want, you could make some 9" bowl cozies and some 10" bowl cozies but if you want to cover a mystery size, as in a gift for someone who's bowls you are not intimately familiar with their size and shape, I recommend the 10" size.
Really, any square size will do. So 8", 9", 10", 9.5".....just as long as they are square. But 9" or 10" is the most common size used for tableware. You might want to make one for serving dishes and go up to 11" or 12" squares.
So, for each cozy we have a 10" square of outer fabric, 10" square of inner fabric, and 2 10" squares of batting. The cozies are reversible when finished so I will refer to inner and outer instead of outer and lining.
The first step will be to place a piece of batting and outer piece together with wrong side facing the batting and sew an X through the middle of the piece. Start at one corner and sew to the opposite corner then repeat for the other two corners. Now do the same for the second piece of batting and the inner fabric. This X is to hold the fabric and batting together.
If you wanted to do more quilting, that could be fun. Not necessary but fun. Some type of twirl in the bottom of the cozy would be nifty. But, there will be darts made and fabric cut, so I would wait on getting elaborate with the quilting and stick with the basic X for the first ones you do.
All right, so we have batting secured to both the inner and outer squares. Now we make the darts. In all the videos I watched they folded the square in half and measured 1" up from the corner and 2" over then drew a diagonal line between the marks. After the first two are marked, fold the other side and mark those corners. Now do that for the other piece.
Whew! That's a lot of tedious measuring and marking and lining up rulers. So each cozy has 8 darts. I am going out on a limb here but am pretty sure that you will be making more than one cozy. Even if you live alone and don't have to squabble over the single bowl cozy, you'll still want one available when the first one is in the wash after you dribbled chili all over it. Lots of left over chili to need to eat while snuggled in the cozy.
That means a minimum of two cozies. But if you have a family you'll need to make 5 or 6 or 10 or 12 and I suspect you'll be making them as gifts. So if you make 5 cozies for a family of 5 that's 40 darts. Sounds like a lot, right? That's where a template comes in.

Tip #1: Make a dart template.
Mark 1" and 2" on a piece of paper, card stock, cardboard, or whatever is at hand and draw a diagonal line between marks and cut. I used a scrap piece of card stock.
You'll notice that it's directional. Don't worry. Just flip it over to mark the other side. Now sew along the diagonal line. In the video they said to sew along the diagonal line then trim off excess fabric along the dart. WAIT!

Tip #2: Walk the edges before cutting the darts.
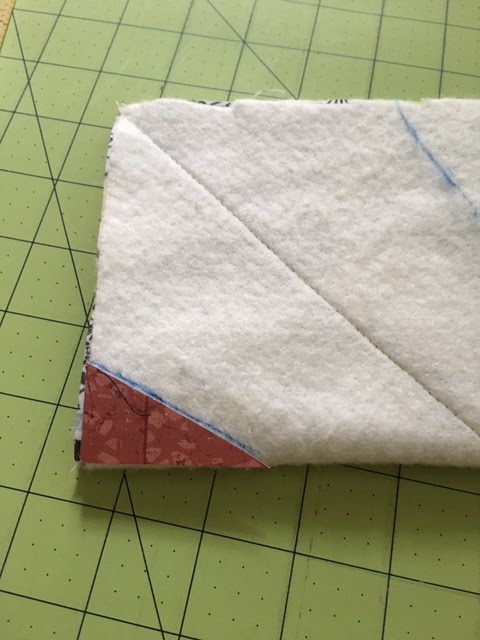
The first batch of cozies that I made was a set of 4. On one dart I was slightly off and that meant that when I checked to make sure that the corners of the inner piece and outer piece matched, they did not. The corner was short over 1/2", too far to ease in or anything and would have really resulted in a messed up cozy.
It was a simple fix to rip out the dart and remark and resew because I had not trimmed off the dart's excess fabric. Once I was certain that everything matched up, then I trimmed about 1/8" or so from dart seam.
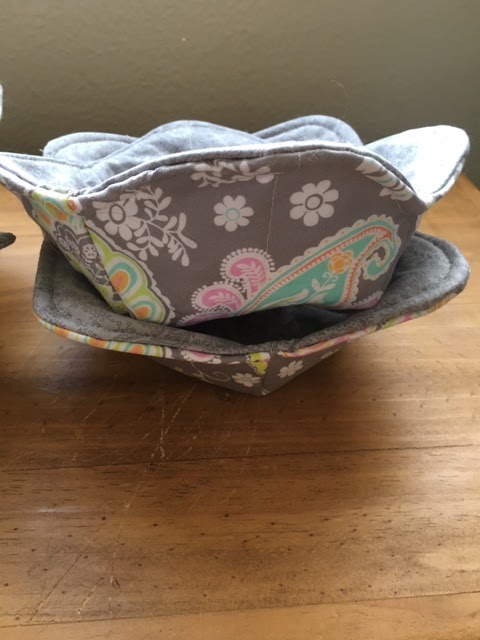
Now we're nearing the end. Did you notice that some of the cozies have pointed corners and some have rounded corners? I like them the best. They look pretty, like a flower and have a lower profile for the bowl. If you want the round corners, just round the corners by finding something round and marking.

Tip #3: Use something round to help round the corners.
I used the bottom of a candlestick holder. You can use a small bowl, a jar lid, or punch out a circle from cardboard or card stock. The goal is just to round the tip off the corner.

Place the two pieces with inner and outer fabric right side together. Mark the corners and trim off the tip of the corner.

Now sew around the perimeter, leaving a 2-3" gap for turning. Pick the straightest spot you can find. The 2" is a snug fit but will still work but if it's too difficult go with 3" gap. It's a lot like giving birth in respect to thinking it's not possibly to get all that fabric and batting through that small space but it will work.
Turn right side out, use finger, chop stick, or something to smooth out corners then sew gap closed while topstitching around.
Done!


